
Raspberry Pi and Azure IoT Hub walk into a bar
Interim step…based on some of the lessons from Azure Edge Essentials walking into a bar I thought it wise to just get the Pi talking to IoT Hub and demonstrate that data flows before sticking the NUC and IoT Ops in the way. And seeing how fiddly some of this was, I’m glad I did.
Step one of this new flow was to get Azure IoT Hub running
Step two, IoT Explorer
Step three, get the Pi talking to the Hub
Step four, visualise the data in Azure Data Explorer
One other thing…I used Claude Sonnet 3.7 extensively as a starting point to get this up and running. And, ho boy, it lies, it gets things wrong constantly. But it does get you closer than if I’d just tried a search. So I found myself in many a rabbit hole going back to Claude saying its wrong, and it going, oh yes try this and then its right.
Does Claude save time, I think so. Is it frustrating as hell to use? Damn straight.
Step One - Azure IoT Hub
Usual, lets not make a mistake. Login to azure:
az loginCreate the IoT hub:
az iot hub create --name <hub name> --resource-group <rg> --sku f1 --partition-count 2I used the free one and oddly it chucked an error without a partition count, so put that there. So far with all this on my Visual Studio Azure I’m up to a grand total of one cent. I suspect after today I’ll be a bit higher, but I’ve made sure I shut the ADX cluster down.
Now create a device in the Hub that the Pi will hook off:
az iot hub device-identity create -n <device name> -d <hub name> --eeOnce created you will need to grab the connection string from the portal. Something like this:
HostName=<device name>.azure-devices.net;DeviceId=<hub name>;SharedAccessKey=qwerrttuiosnfuallm4578495mmdfofd9d9df9=Now back to the Pi. You need to modify the config file for the IoT Edge on the Pi by running:
sudo nano /etc/aziot/config.tomlAnd then adding what is below to the config file:
[provisioning] source = "manual" connection_string = “HostName=<device name>.azure-devices.net;DeviceId=<hub name>;SharedAccessKey=qwerrttuiosnfuallm4578495mmdfofd9d9df9=“ To apply the new config run:
sudo iotedge config applyAnd a check of the running you should get lots of yeses and running things you need:
sudo iotedge system status
sudo iotedge check
At this point the Pi is configured to send data to the IoT Hub. Lets get ourselves ready to see the data flow.
Step two - Azure IoT Explorer
Simplest way of doing this is to install Azure IoT Explorer. This allows you to connect to the IoT Hub and the device you just created and see the data flow.
https://learn.microsoft.com/en-us/azure/iot/howto-use-iot-explorer
You’ll need the IoT Hub connection string to enable the IoT Explorer to see things:
az iot hub connection-string show --hub-name <hub name>I would also recommend in the IoT Hub create additional consumer groups; if you only have one and ADX is using it then IoT explorer stops. So create a couple of others for ADX and IoT Explorer to stop clashes.
Once all tickety boo you get real time data ingestion once you run the scripts on the Pi to send the data.
Step three - Pi Python Code
Next step. Get the Pi sending the data. Python is the simplest way to get this going.
First step is you need to smash the Pi security to bits by installing the azure-iot-device bits:
python3 -m pip install azure-iot-device --break-system-packageIf you don’t do that all the Debian security kicks in and you need to create a virtual environment to run it. Each. And. Every. Time. Obviously don’t do this in prod kids.
If you don’t do that, then when you try and run the script it chucks an error message at you saying Azure not found. Even if it seems the pip install had worked. Got lost in that hole for a bit.
Now the python code that does the heavy lifting:
import asyncio
import time
import json
from sense_hat import SenseHat
from azure.iot.device.aio import IoTHubDeviceClient
from azure.iot.device import Message, MethodResponse

CONNECTION_STRING = "HostName=<device name>.azure-devices.net;DeviceId=<hub name>;SharedAccessKey=qweryuisnfiospfm57438056346="

async def send_test_message():

# Initialize Sense HAT
    sense = SenseHat()
    sense.clear()  # Clear the LED matrix

# Display a startup message
    sense.show_message("Azure IoT", text_colour=[0, 0, 255])

# Create instance of the device client

    device_client = IoTHubDeviceClient.create_from_connection_string(CONNECTION_STRING)

# Connect the device client

    await device_client.connect()

    print("Connected to Azure IoT Hub")

    try:

# Send a test message

        message = "Hello from Raspberry Pi!"
        print(f"Sending message: {message}")
        await device_client.send_message(message)
        print("Message successfully sent!")

# Display a connection success indicator
        sense.set_pixels([
            [0, 255, 0], [0, 255, 0], [0, 255, 0], [0, 255, 0], [0, 255, 0], [0, 255, 0], [0, 255, 0], [0, 255, 0],
            [0, 255, 0], [0, 0, 0], [0, 0, 0], [0, 0, 0], [0, 0, 0], [0, 0, 0], [0, 0, 0], [0, 255, 0],
            [0, 255, 0], [0, 0, 0], [0, 0, 0], [0, 0, 0], [0, 0, 0], [0, 0, 0], [0, 0, 0], [0, 255, 0],
            [0, 255, 0], [0, 0, 0], [0, 0, 0], [0, 0, 0], [0, 0, 0], [0, 0, 0], [0, 0, 0], [0, 255, 0],
            [0, 255, 0], [0, 0, 0], [0, 0, 0], [0, 0, 0], [0, 0, 0], [0, 0, 0], [0, 0, 0], [0, 255, 0],
            [0, 255, 0], [0, 0, 0], [0, 0, 0], [0, 0, 0], [0, 0, 0], [0, 0, 0], [0, 0, 0], [0, 255, 0],
            [0, 255, 0], [0, 0, 0], [0, 0, 0], [0, 0, 0], [0, 0, 0], [0, 0, 0], [0, 0, 0], [0, 255, 0],
            [0, 255, 0], [0, 255, 0], [0, 255, 0], [0, 255, 0], [0, 255, 0], [0, 255, 0], [0, 255, 0], [0, 255, 0]
        ])
        time.sleep(2)
        sense.clear()

        while True:
            # Get sensor data from Sense HAT
            temperature = sense.get_temperature()
            humidity = sense.get_humidity()
            pressure = sense.get_pressure()

            # Get orientation data
            orientation = sense.get_orientation()
            pitch = orientation['pitch']
            roll = orientation['roll']
            yaw = orientation['yaw']

            # Get accelerometer data
            acceleration = sense.get_accelerometer_raw()
            x = acceleration['x']
            y = acceleration['y']
            z = acceleration['z']

            # Create message
            data = {
                'temperature': round(temperature, 2),
                'humidity': round(humidity, 2),
                'pressure': round(pressure, 2),
                'orientation': {
                    'pitch': round(pitch, 2),
                    'roll': round(roll, 2),
                    'yaw': round(yaw, 2)
                },
                'acceleration': {
                    'x': round(x, 2),
                    'y': round(y, 2),
                    'z': round(z, 2)
                },
                'deviceId': 'senseHatRaspberryPi',
                'timestamp': time.time()
            }

            # Create IoT Hub message
            message = Message(json.dumps(data))
            message.content_type = "application/json"
            message.content_encoding = "utf-8"

            # Add custom properties to the message
            message.custom_properties["sensorType"] = "SenseHAT"
            message.custom_properties["processingType"] = "RealTime"

            # Send message

            print(f"Sending message: {message}")
            await device_client.send_message(message)
            print("Message successfully sent!")
            print(f"Message sent: {json.dumps(data, indent=2)}")

            # Show temperature on LED matrix (optional visualization)
            sense.show_letter("T", text_colour=[255, 0, 0])
            time.sleep(0.5)

            # Calculate color based on temperature (blue=cold, red=hot)
            temp_color = [min(255, max(0, int((temperature - 15) * 10))), 0, min(255, max(0, int((30 - temperature) * 10)))]
            sense.clear(temp_color)
            time.sleep(1.5)

            # Wait before sending next batch of data
            time.sleep(5)  # Send data every 5 seconds total
            break

    except KeyboardInterrupt:
        print("IoT Hub client stopped")
        sense.clear()
        sense.show_message("Bye!", text_colour=[255, 0, 0])
    except Exception as e:
        print(f"Error: {str(e)}")
        sense.clear()
        # Show error indication
        sense.show_letter("E", text_colour=[255, 0, 0])


    finally:

# Disconnect the client

        await device_client.disconnect()
        print("Disconnected from IoT Hub")

if __name__ == "__main__":

# Run the send test message function

    asyncio.run(send_test_message())
The sent data will look something like this in IoT Explorer:
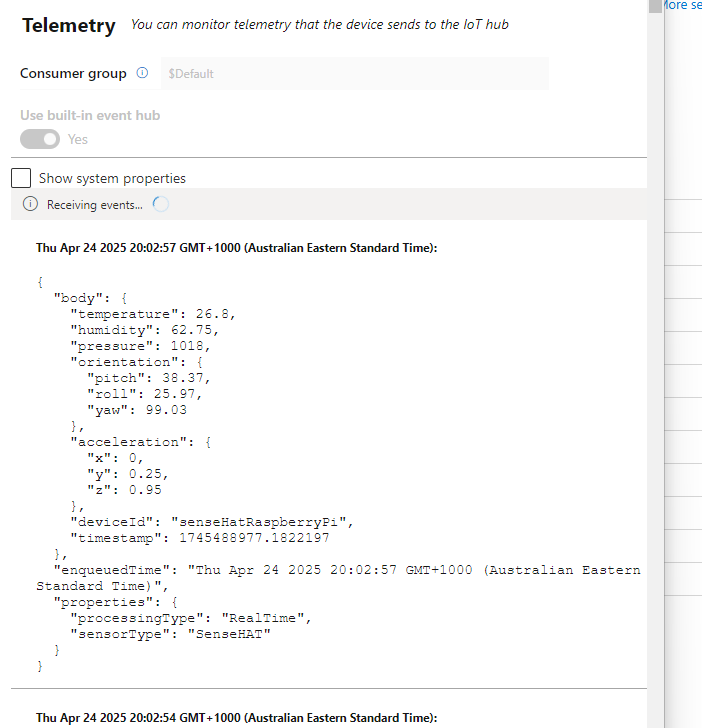
If you aren’t getting data in IoT Explorer…you have something broken. Go fix.
Final step is to use Azure Data Explorer to show all the data in a published format.
Step four - Azure Data Explorer
Use the steps in the URL below to create an Azure Data Explorer cluster.
Do not use the free version as that seems to only have Azure Event Hubs as an ingestion method; you need to be able to being in IoT Hub data. For these purposes Dev/Test is fine, and cheaper.
https://learn.microsoft.com/en-us/azure/data-explorer/create-cluster-and-database?tabs=full
Once you have the cluster up and a database created you need to create a table for the data to be ingested too…and a mapping so the JSON can be parsed. Using KQL you need to run:
.create table IotTelemetry (deviceId: string, timestamp: datetime, temperature: real, humidity: real, pressure: real)
.create table IotTelemetry (deviceId: string,    timestamp: datetime,    temperature: real,    humidity: real,    pressure: real)

.create table IotTelemetry ingestion json mapping
'IotTelemetryMapping' '[{"column":"deviceId","path":"$.deviceId","datatype":"string"},{"column":"timestamp","path":"$.iothub.enqueuedTime","datatype":"datetime"},{"column":"temperature","path":"$.temperature", "datatype":"real"},{"column":"humidity", "path":"$.humidity","datatype":"real"},{"column":"pressure", "path":"$.pressure", "datatype":"real"}]'
With the table and the mapping done you create the connection to the IoT Hub. Details in the URL below:
https://learn.microsoft.com/en-us/azure/data-explorer/create-iot-hub-connection?tabs=portal
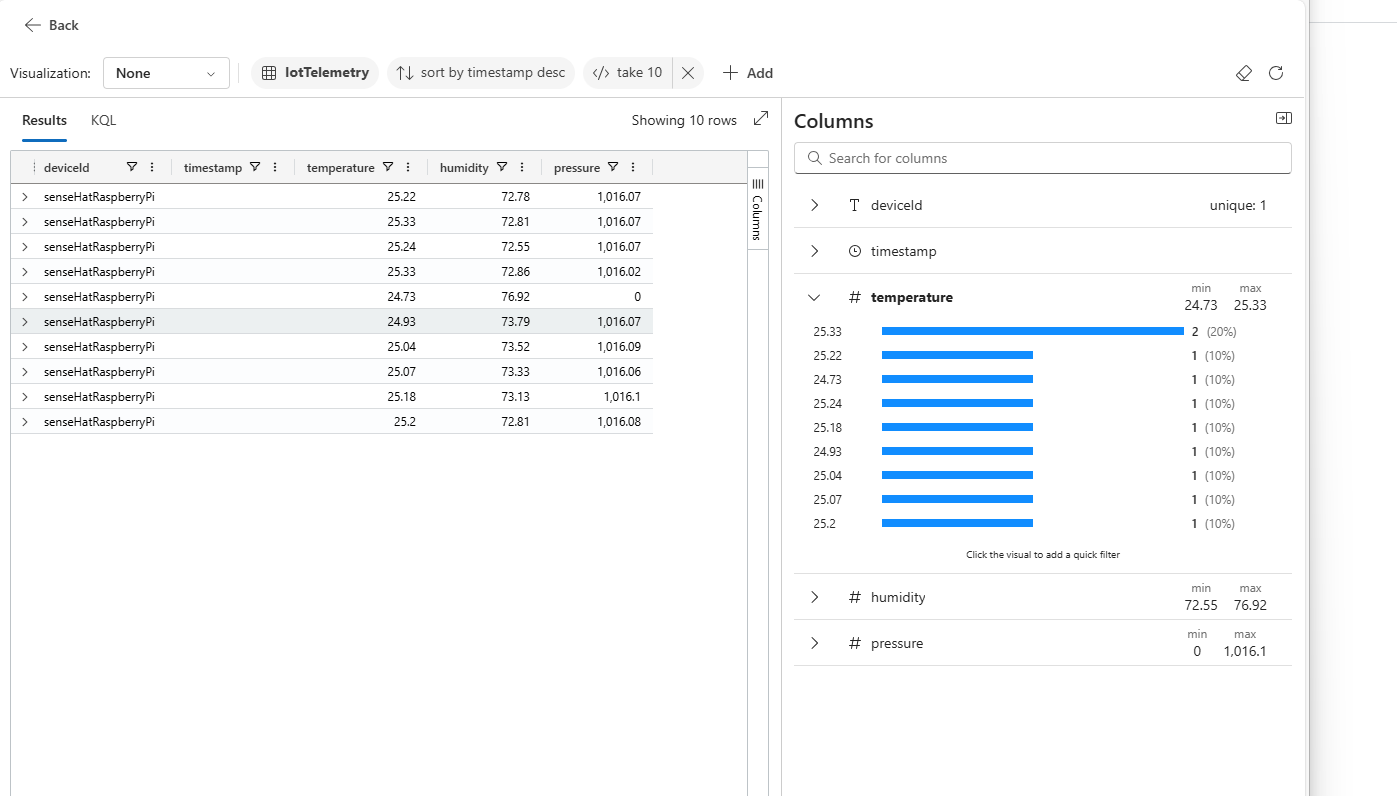
Just use the default SAS. And chose the consumer group you made earlier. Data should be flowing now. To check you can use the queries below:
IotTelemetry
| sort by timestamp desc
| take 10

IotTelemetry
| summarize arg_max(timestamp, *) by deviceId
| project deviceId, timestamp, temperature, humidity, pressure
Once you are sure you have the data, then it is possible to create a dashboard for the data and publish that. You should see:
So at this point we have a proven Pi that sends data happily to Azure IoT Hubs with published data.
The third, and I hope, final part of this question will be to chuck the NUC with Azure IoT ops in the middle and see how that all works out.
Next time kids.